Melonpan recipe

Melonpan is a sweet bread bun with a sweet crunchy coating.
Along with Baumkuchen, Melonpan is a delicious cake you'll often see for sale in shops in Japan. I haven't been able to find a recipe for Baumkuchen you can make at home yet, but cooking with dog have done a great video on how to make Melonpan:
Ingredients
Bread Dough
140 g Bread Flour 25 g Sugar 1/3 tsp Salt 5 g Skimmed Milk Powder 3 g Instant Yeast 1 tbsp Beaten Egg 60 ml Warm Water 15 g Butter
Cookie Dough
25 g Unsalted Butter 35 g Sugar 25 g Beaten Egg 80 g Cake flour or Self Raising Flour 1/4 tsp Baking Powder
The above ingredients makes enough for 5 melonpans. You can double or triple up the ingredients to make a larger batch, but these really taste at their best when they're straight out of the oven. If you don't have butter or unsalted butter, or they're too expensive, you can always use baking margarine as a substitute, they still taste great.
You might also notice that the Cooking with Dog recipe uses 'Cake flour' for the cookie dough. We don't have this type of flour in the UK, so I use self raising flour instead.
Melonpan Recipe
When making the melonpan I basically follow the Cooking with Dog recipe, it is quite easy to make, but takes a long time (a few hours).
Making the cookie dough
Start by making the cookie dough, whisk the butter / baking margarine (I use an electric whisk), Make sure the butter is soft before you do this though (I put it in the microwave for a minute on Low). Add the sugar and whisk more. Gradually add the beaten egg and whisk more. A standard egg weighs about 50g, so you can use one beaten egg if you are making a double batch.
Mix the self raising flour and baking powder, then sift them. The cooking with dog Melonpan recipe says to sift the flour twice, it's probably not essential, but it doesn't take much extra effort to sift the flour twice. Mix the flour / baking powder in with the rest of the mixture, and mix together.
When the cookie dough is well mixed, put it out on some cling film (plastic wrap). Make it into a fat sausage shape, cover with the cling film, and chill in the fridge.
Making the Melonpan bread dough
Add the bread flour, sugar, salt, skimmed milk powder, and instant yeast powder to a bowl and mix. Mix the beaten egg with the warm water and add to the dough. The melonpan recipe that cooking with dog suggests uses 70ml water, however I would suggest a bit less - 60ml. I found the dough would still be too sticky even after much throwing and kneading when using 70ml water.
Mix the egg-water in with the flour until its all mixed in. The mixture might look quite dry, with not all the flour being mixed in, but this is okay. Scrape it all out on onto a worksurface. In the cooking with dog video they use a wooden board, but I just use a kitchen table.
Using your hands knead the dough a bit and mix in any flour that wasn't fully mixed in when you were stirring the mixture in the bowl. You'll quickly find that the dough becomes quite sticky. Throw the dough against the work surface a bit, kneading it every few throws. Do this until the dough becomes less sticky - it will still be sticky, but not really sticky. When throwing the dough against the work surface, pick it up by one end, folding this end up against the other end. You want to be adding air into the dough.
Now spread the dough out using your fingers to about 1-2cm thickness. Spread the butter or baking margarine on the dough using your fingers. (You'll need the butter warmed to be able to spread it). Fold the corners of the dough into the middle, then fold the dough up and start to knead it. All the butter will probably squeeze out and go over your hands, but this is okay.
Repeat the kneading and throwing process for about 10 minutes, and you'll find that magically the dough gradually absorbs the butter and becomes less sticky! If the dough is still very sticky after 10 minutes you'll need to add some more flour and keep kneading and throwing until it stops being sticky.
When that's done, put the dough back in the bowl, cover with cling film / plastic wrap, and put it in the oven at 37°C to rise. I don't have an oven that can be set to a temperature as low as 37°C, so I set the oven to the lowest temperature it will go (turn the dial until the 'heating' light comes on), which is probably about 50°C. We have a dual oven with both fan assisted and non fan assisted ovens, I put it in the oven that is not fan assisted. I leave the dough to rise for 40 minutes, and this works well.
I have previously tried rising the dough in the microwave on the lowest setting, but this did not work well at all, and just cooked the dough, killing the yeast.
Putting the cookie and bread dough together to make Melonpans
After 40 minutes, remove the dough from the oven. It should be around double its previous size. Flatten the dough to remove any large air bubbles, then roll the dough into a sausage. Split the dough into 5 equal parts (or 10 if you are making a double batch). You can weigh the dough before you cut it, and then weigh each piece when you cut it to ensure it is one fifth of the total weight if you want to be precise. (This is what cooking with dog recommends, and how I do it).
You will find that each piece of dough is sticky on the sides where it has been cut, but matte on the rest of the outside. Stretch part of the matte bit out on top, and then using your thumbs underneath, push the dough inside of itself. It's difficult to explain this bit, but if you watch the cooking with dog video you can see how the lady does it.
Make each piece of dough into a ball, then put on a tray. Cover the tray with cling film and leave to rest for 20 minutes. While the dough is resting you can work on the cookie topping.
Take the cookie dough from the fridge, and do the same as you did with the bread dough, cutting it into 5 equal pieces. Form each piece into a ball. Draw a circle with a 4.5cm (1 3/4") radius on a piece of paper, then put a piece of cling film / plastic wrap over the paper. Put a cookie dough ball at the centre of the circle, then rest another piece of cling film on top of the dough ball. Now press the dough ball down using a flat object like a scraper until it is the same size as the circle.
Place the flattened cookie dough circle on a lightly floured tray, then repeat with the rest of the cookie dough balls. When finished, put the tray in the fridge.
After 5-10 minutes remove the cookie dough circles from the fridge. Take a melonpan dough ball and wrap a cookie dough circle over the top and sides of the dough ball. When putting the cookie dough on top of the melonpans, be careful not to stretch it too much or get any holes in it. Otherwise it will rip when you come to rise the dough again later.
Holding onto the bottom of the melonpan, dip the cookie dough covered section into sugar, rolling it around to get it covered all over. Use a scraper or spatula or something similar to score a diamond pattern on top of the melonpan. Put the melonpan in a baking or roasting tin (like a tray with tall sides). Don't press too hard though.
Repeat this with the other melonpans, then cover the tray with cling film / plastic wrap. Put the tray in the oven again at 37°C for around 40 minutes.
When the melonpans are nearing the end of this second rising, pre-heat your main oven (not the oven they are rising in) to 340°F / 170°C / Gas mark 3½.
When the melonpans have risen, remove the cling film and then bake them for 12 minutes.
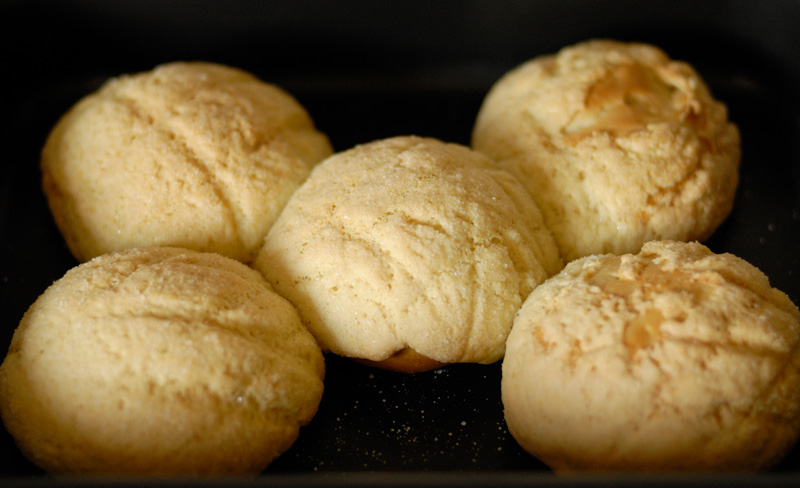
In the photo above you can see the cookie dough was stretched too much on the two melonpans on the right, which has caused the topping to split. They still taste the same, but don't look so nice.
The melonpans are best a few minutes after cooking, but of course, they're still nice cold, or reheated in the oven at a later date (3-5 minutes at 150°C).
Melonpans will also freeze without issues. I suggest making them up to the point before you put them in the oven for the second rising. This way they are smaller and won't take up as much space in your freezer.
Place the Melonpans on a tray, and put this in your freezer. This lets them freeze without sticking together. When frozen, remove them from the tray and bag them up. When you want to use them, it is just a case of rising them and then cooking. Bear in mind the rising will take longer since you are starting with a frozen bun.